Total Pageviews

Showing posts with label embroidery. Show all posts

Monday, January 04, 2016

Boro

No, I'm not even going to bother with excuses this time. I just haven't felt like blog writing for several months.

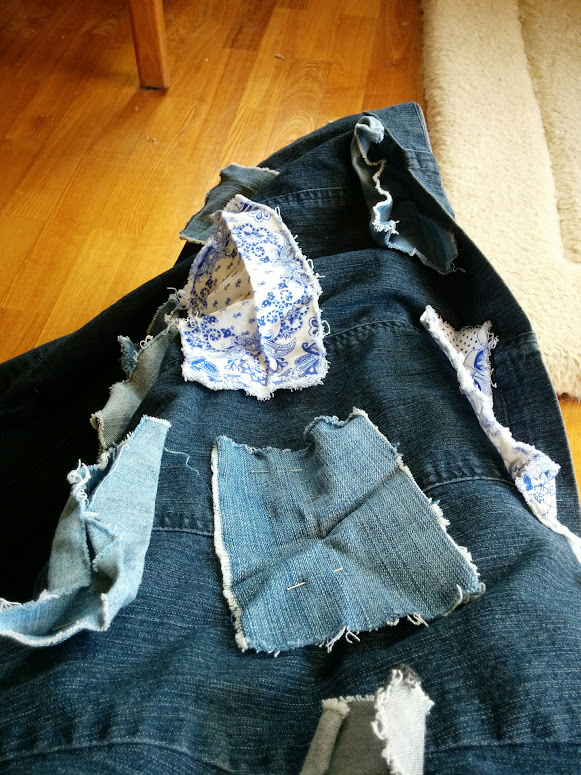
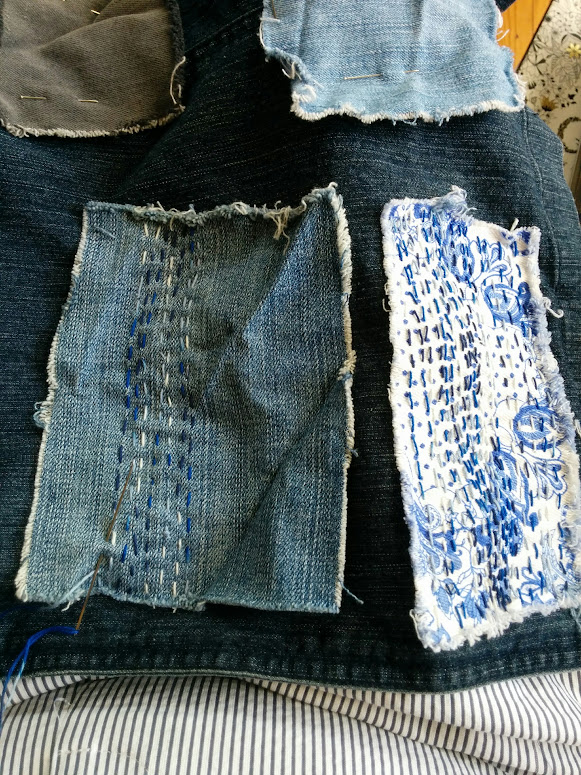
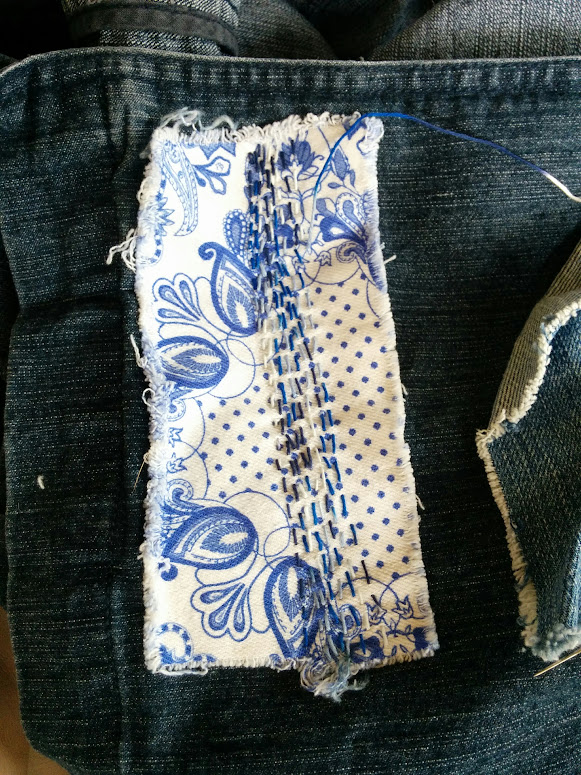
I've just started an upcycling project. Years ago I bought a denim trench coat with the intention of embellishing it in some way. I've had various ideas but none that ever really jelled. I've been reading about the Japanese art of boro and have been hankering to give it a go, so finally decided to try it on the trench coat. I have cut up scraps of denim left over from other projects, or from worn out clothes, into rough rectangles and I am sewing them around the bottom edge of the coat with running stitch. I don't really know what it will look like, but it's worth a go! The only problem so far is that I am sewing on the front of the coat where I have to go through two layers of denim plus the patch, because of the facing, and it's hurting my wrist a bit. Most of the patches will only go through one coat layer, however, so should be easier. Herewith some progress pictures:


It will a slow project, obviously, which suits me fine - it can easily be done in front of the television.

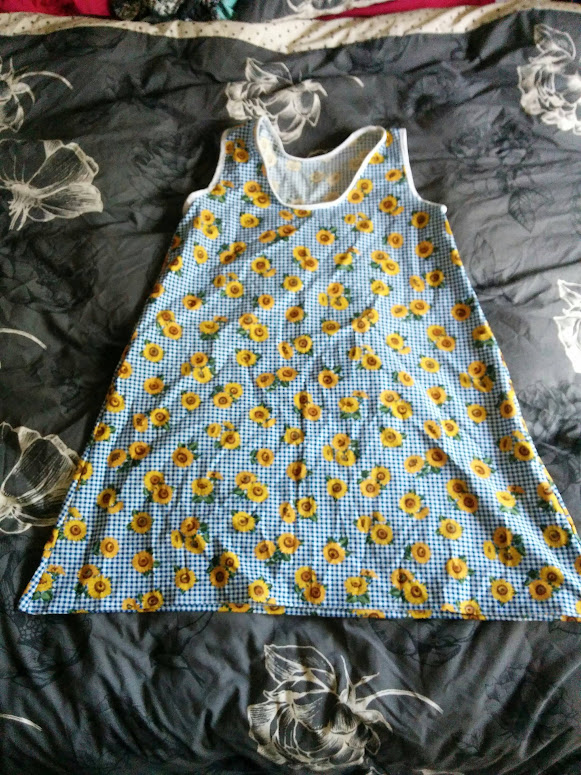
Dressmaking remained largely in my imagination during 2015, sadly. I did finally finish this dress - I drafted this pattern myself and the cotton turns out to be a little too robust for the style. It makes a very comfortable and cool dress to wear at home on hot days. I would only wear it out of the house with something under it (leggings? jeans?) and I guess that with a few more washes, the quilting cotton will soften and drape a bit better and get that lovely patina that quilting cotton gets after it's been washed quite a few times. I am halfwayish through a reversible dress - one side green, one side purple - so hopefully at least some progress pictures will happen soon.


Thursday, January 22, 2015

Fun With Sharp Needles

Fianlly, what I started at Geelong Fibre Forum last year has been finished. Well, more or less finished - it is a triptych and I can't decide how to arrange them or finalise the piece.

The work is called (at the moment anyway!) We Look At The Land Through Different Eyes, You and I.


I won't go through every step of the technique I used, as Carolyn Sullivan teaches this and it is definitely not my place to reproduce her class! But I will run through the main steps.

The base for these pieces is wool/viscose felt from Spotlight - good quality and nice to handstitch through. Then I used an embellisher machine to apply bits of hand-dyed scrim (by me) and prefelt (not dyed by me), embellished a few pieces of hand-dyed silk ribbon (not dyed by me either). Then lots of stitching in Appleton's crewel wool, two strands in the needle - mostly kantha stitch and seeding stitch. Then I ran the embellishing machine over the whole piece again to embed the woolen stitches (and make sure the other bits were thoroughly embedded. Finally, lots of kantha and seed stitching in variaged perel cottons (commercially dyed).

The inspiration - we spent a morning sketching views and close-ups near Geelong Grammar, and taking photos too. During the afternoon of fiddling around with our sketches, narrowing down possibilities and in many cases making further sketches from photos, I settled on a sketch I had made of a photo of a eucalypt.


Carolyn helped me to isolate a section of the sketch I had made. While mulling over the final sketch I was suddenly sparked by memories of a lecture the previous night by an artist whose name I have forgotten, and a book I studied for Literature - That Deadman Dance by Kim Scott - and came up with the idea of looking through the tree and seeing the landscape at morning and night out over the water, and in reverse from the sea to the bush and midday. Using the lines of the bark and seeing the background through them - to me it gave me the idea of a 'ghost gum' - not in the sense of the actual gums that are known as ghost gums, but a ghost of the past/present/future of the landscape and the people.

It's another example of slow creating, as it took quite a while, but I can honestly say that I loved every second of doing this work. So much so that I have another one at the design stage, vaguely inspired by Mrs Dalloway - I certainly didn't start out intending to create works based on books I am studying, but it seems to be turning out that way right now!

Edited to add - an embellishing machine is a needlefelting machine - it looks like a sewing machine but is much lighter and has a set of needles (5 in mine) with barbs which mesh threads together when you run it up and down through the fabric. I have the cheapest domestic version.

Friday, June 21, 2013

Alice Springs Beanie Festival 2013

George promised that if I entered at least one beanie in this year's festival, we would go and visit.  So I did the maximum two permitted. The theme this year was 'Friendship'. I must say I had trouble working out wht most of the entries I saw tonight had to do with friendship! But they were all amazing.  I didn't win any prizes, which I hadn't really expected to do, but sold one of them tonight, which was the opening night.  Without further ado, here are the two entries and their stories:

I admit to being obsessed with Dr Who. They are Dr Who entries.

The red one is based on a fez, though it's much taller - imagine the really ridiculous hats worn in the medieval series of Blackadder, and that's what it looks like on.  I took the words from C.S. Lewis's the Four Loves to signify various forms of love/friendship.  An overriding theme, to me, of Dr Who is the way he always has to leave his friends behind, no matter how much he loves them, and outlives them by centuries.

It is knitted in two strands of red DK pure wool and felted in the washing machine, about five times, and dried over a flower pot on top of a large tin of dog food.  And the words embroidered with black knitting cotton.


THE FOUR LOVES


This one was inspired by the Van Gogh story in a previous series of Dr Who where the Doctor and Amy Pond jollied Vincent along and he painted Starry Starry Night with the Tardis in the sky.

It is a standard cloche shape knitted in DK dark blue pure wool and felted in the machine, then dried over a Pyrex mixing bowl.  A variety of dyed Wensleydale locks were needlefelted in swirls around it, using my trusty (but not much used) cheapo needlefelting machine, then holographic star sequins were sewn on in clusters.

STARRY STARRY NIGHT


 This is the one that sold!!!

The opening night was huge fun.  I will blog more another time.  I bought three beanies, one sober manly one for the sober and manly George, and two madly frivolous ones for me.

We are having AN ADVENTURE.


Thursday, February 09, 2012

My Creative Space

Well, that was a much longer blogging hiatus than I had intended, but things just got away with me. Now my blogging mojo has, hopefully, returned.
I took three weeks off over Christmas and pootled around, doing some reading/crafting/TV watching/family stuff/time away. All very pleasant and satisfying. Another post will have some pics of our holiday in Adelaide and Mt Gambier. But this being my first Creative Space for the year, I suppose I had better post something actually created!
These are completed ATCs (Artist Trading Cards), my first ever, hence the distinct wonkiness. I did take pictures of the back too but have forgotten to put them on the USB which I am using at work to download these. I agonised over the backs for weeks, but in the end an article in Sew Somerset got me thinking and I decided to just embroider my name and the year in deliberately wonky hand stitching, and hand stitch the backings on.
They all have a basis of Mazey Patchwork, with hand embroidery and embellishments added after the initial machine stitching.


This has a heart-shaped Suffolk Puff held in place with a flower button, a silver charm that says Be True and some hand stitching. The fabrics are velvet, polyester chiffon (off-cuts from dressmaking) and quilting cottons from the stash.


This has a Suffolk Puff held down with a fancy button from somewhere, hand embroidery, a scrap of lace, and the fabrics are various scraps from the stash including a polyester chiffon.


And the final one has much the same mix of fabrics, hand stitching, and a clutch of tiny teddy buttons I bought at a craft fair somewhere.

For more Creative Spaces look over here...

Thursday, December 22, 2011

Some embroidery

Remember the bits of Mazey Patchwork I cut out and showed a couple of weeks ago.  I have been slowly starting to embellish them, production line style.  First of all, some hand stitching - pics below.  When I have embroidered a lot of them, or got bored, I will find appropriate beads/buttons/stuff to add to them.  But I;m too tired to do anything most of the time :(  At least I have three weeks off work starting Christmas Eve!!


Picasa has gone all fancy and added all the fun filters that you can get on mobile phone apps now!

I would like to wish all of my dear readers a wonderful Christmas, if that's what you do, or a wonderful holiday, or a blissful unawareness of the fact that anybody is celebrating anything at all.  Maybe by next week I will have something else to show.  Then again, maybe not!

Friday, December 09, 2011

My Creative Space


Posted by PicasaI have had a bit of fun.  The to picture is a piece of my Mazey Patchwork, made by sewing various scraps onto a base fabric, like crazy patchwork only deliberately left all frayed.  Then I chop it up and embellish the pieces individually.  I finished the big piece quite a while ago but haven't done anything with it, so as I had the day off yesterday I cut out some pieces to start fiddling with at the weekend.

It looks like I might have a few hours on Saturday at my MiL's before attending my neieces 21st, so I am packing up some of the small pieces together with a selection of threads (probably mainly blues with a couple of contrasts) and I will pootle around embroidering them.  Further embellishments with buttons or beads or suffolk puffs, or maybe all three, will follow later at home.

For more creative spaces, pop over here.  It's the last official Creative Spaces for the year, though I promise I will continue to post any pics of anything that I might find time to do!!

Thursday, December 01, 2011

My Creative Space

I am still experimenting with buttons.  i am was just about to give the whole thing away because I was getting frustrated with the scale, and I don't think these will take over from my other things in the long run, but I have gained some terrific ideas along the way.  They are all button brooches, so they look like buttons from the front but have a brooch back on, er, the back.


Ok, so this is, obviously, not a button, nor a brooch.  It is a cake.  Not even a cunningly fabricated textile cake meant to worn on something (a hat maybe).  It is a Stephanie Alexander chocolate cake and you can tell by the amount left over how disgusting it tasted.  This was a whole 24 hours after making it!


This is a brooch with seeds beads embroidered on silk dupion.  It is not a cake.


Ceci n'est pas une gateau.  It is a mass of French knots on silk dupion.  You may have seen it already before it became a brooch.


Yeah, I showed this one before too, it's cross stitch in variegated thread.  On silk dupion. 


This is silk dupion decorated with a scrap of sari silk from The Thread Studio.  Lovely Dale sent me a baggie of sari silk scraps when I won a Facebook giveaway.  I promised I would use them on something.


And this is a cake. 


This is one of the buttons I bought at the button fair I blogged about a while ago.  I have a whole card of these, the original card, which I am going to keep if I ever use all the buttons.  They are immediately post-war Parisian.  The fact that I had matching embroidery thread in the pile by my chair was a complete co-incidence!

(Actually, the blue thing isn't really a cake).

For more creative spaces pop over here.  There might even be cake but don't blame me if there isn't!

Monday, November 28, 2011

Take a Stitch Tuesday (TAST)

Anyone interested in this?

http://www.pintangle.com/journal/2011/11/26/the-big-list-of-2012-tast-challengers.html#comment16009104


Have a look at the Pintangle blog.  The idea is that every Tuesday the author of the blog posts an embroidery stitch and participants learn it, experiement with it, and post a picture of it.  Participation every week for a year is NOT compulsory.  This is some of what she says about it:

'Cost:
The challenge is free

Skill level:
All skill levels are welcome

How does it work?
Each Tuesday I will post a challenge stitch for the week. You work an example of the stitch. Learn the stitch, experiment a bit, take it a bit further if you have time then photograph it, and load it to stitchin fingers or put it on your flickr site or write about it on your blog. Then you come back here, leave a comment on the post where I posed the challenge and tell everyone where they can see your sample.

If you are busy and want to swing in and out of the challenge as life dictates that is fine too. I cant make it more guilt free than that. Simply put all who want to stitch are welcome. However, last time people that worked all the stitches said that they learnt a lot! Even stitches that did not initially appeal to them, they learnt from, discovered a way of working and sometimes were surprised to find they enjoyed them.
When does it start?
The first Tuesday in the new year which is January 3rd. It will run from this blog every Tuesday after that.'

I thought it might be fun to at least dip in and out of.  I remember seeing some of the results of the 2010 challenge and they were interesting.  I thought it might encourage me to learn, build upon and force myself to document some new embroidery skills.

Monday, October 31, 2011

Blogtoberfest 31


Posted by PicasaI blogged about this a while ago but it still holds great resonance for me.  Part of me wants to do scholarly stuff on the subject, another part of me wants to do work inspired by it instead.  (While the major part just wants to sleep).

Hope you have enjoyed Blogtoberfest!  It has been fun.  I found it a good way to go through old photos and use Blogger's pre-scheduling thing, plus the occasional new post.  And don't forget that giveaway.  I will draw it (or my disinterred, and disinterested, husband will) over the weekend. 

Saturday, October 29, 2011

Blogtoberfest 29


Posted by Picasa
I am VERY SLOWLY working through Karen Ruane's online course.  There's the whole working thing, which takes up all day and then I'm knackered at night, so progress is painfully slow.  Plus I have been really sick this week with a virus that has robbed me of the ability to think or concentrate (so it's pretty much the same as normal, then!)


But here are three more potential button brooches.  Again done on silk dupion.  Can you tell I am having fun! And this is less than one-third of her course, I need to do all sorts of other fun things as well!

Tuesday, October 25, 2011

Blogtoberfest 25


I am doing an online Button course with Karen Ruane.  I am a bit behindm ost of the others, because of working and time and all, but I am having the most fun!!!  These are the only pictures so far, though I am busy working my way through a pile of others.  Karen insisted that we not copy her slavishly but to use our own ideas, and of course she is a very wise woman.  I adore her work, so my first attempt actually was a go at reproducing her work fairly exactly, and I got frustrated and cross and hated what I was doing.  so I pulled it out and did what she had said, use her ideas as inspiration but do it my own way, and of course she was right.  I ended up much happier with these two.

The bottom picture, the one with the two circles in it, is the work before being damp stretched.  I had never tried that before and wondered if it was worth the effort, but now I can definitely say that it is.  I used Perle thread on silk dupion and embellished with some precious little flower sequins and tiny seed beads.  The top two pics are taken after the damp stretching, and believe me it made a difference.  They look much crisper and nicer now.

So I have already learnt a lot.  No matter how much you love someone else's work, it is always better to use it as a jumping-off point rather than trying to copy it.  Damp stretching is both easy and miraculous.  Silk dupion is wonderful to stitch on (though you do need to use a hoop, which I don't normally do, but I am finding invaluable). 

I am now doing some with colour, still on the white silk.  But there won't be pictures for about a week.  And there are other fun things to learn, about lumps (puffs, actually) and turning them into actual buttons and/or brooches.

Thursday, October 13, 2011

Blogtoberfest 13


This is a piece I did in the second year of my Diploma when we studied 3D objects.  We had to end up with a container.  I can't remember if it had to have something in it or not, but mine did.  I chose to do a reliquary because they have always fascinated me and I love the application of textile arts to religious symbolism. 

After a bit of researching I quickly came up with the idea of Santiago de Compostela and the pilgramages undertaken to the Cathedral there, known in English as the Way of St James.  I had lots of fun playing with various surface and design finishes until I came up with the one I finally chose, which was fine white silk randomly splashed with silk paint in warm colours of red, pink, yellow and orange.  It was lined with red silky stuff.  I also embroidered it in random patches of running stitch using similar colours, but not on painted patches of the same colour.  I became very fond of that technique of patches of running stitch and it became one of the main embellishments I use in my Mazey Patchwork.  Gold paint and gold thread was also used, because I wanted an opulent feel in keeping with the idea of a medieival reliquary.

I had intended using stiffish interfacing in it but my teacher at the time got all huffy about using a synthetic interfacing and told me to use calico.  I did trial calico and it seemed to work but I regret not using the original idea as it never did stand as stiff and straight as I wanted.  She and I were a bit mixture, big personality clash and completely different interests and values.  She taught me for two subjects that year and told me that she was only passing me in one of them (not the one we did this project in, she couldn't very well fail me in that because my final project was as good as anyone else's!) because she didn't want to do the paperwork involved in failing me.  Miserable woman.  She didn't work there again after that year.

A reliquary obviously has to hold a relic.  I used gold Delicas to bead a tiny vial using peyote stitch, including a tiny beaded lid which was attached by a couple of beads and fastened with a beaded loop, and it contained the arm of Saint ... I can't actually remember the name I made up but I created a wholly fictional saint, with a back story and everything!  The arm came from a nasty little plastic doll from the $2 shop that I hacked off and stained with paint the colour of dried blood.  I think I may have included a hand as well.

The 'lid' comes from the tops of the panels, six I think there were, triangular in shape, with threads tieing them together and a shell shaped gold button to hold it altogether (the shell being the symbol of St James of Compostela).

I chose this particular picture for this post because I like to think of it as a rather arty-farty photo, but I do have more process-oriented photos that I can post if anyone is interested in the more practical side of it.  It was a fun thing to make and I am still proud of it!

Wednesday, October 12, 2011

Blogtoberfest 12


The last pear, I promise!

This involved experimentation, and was fun.  It was the first time I had ever used Tyvek, or painted Wonder-Under or whatever you want to call that applique stuff you iron onto one surface and then use it to adhere to another.  (The iron and the ironing board, frequently!)  The Tyvek is painted then ironed and cut into a pear shape and sewn down to the background, which is half painted Wonder Under and half painted calico (well, the whole thing is calico, but some of it has the other stuff on top of it, if you get what I mean!).  Then the bottom bit has machine stitching on it to simulate the look of a striped table cloth.

Tuesday, October 11, 2011

Blogtoberfest 11


Um, it's a pear.  Again.

A rather bad example of attempting to create modern blackwork in a hurry when you haven't done blackwork for 30 years.  Green embroidery thread on even-count linen.  My least favorite pear.  But I love blackwork and really want to have a go at designing some PROPERLY at some stage.

Monday, October 10, 2011

Blogtoberfest 10


Another pear.  This one is made from air-drying clay (which stinks, btw), deliberately left roughly moulded with finger prints in it.  Then painted and rubbed with a wad of kitchen towel and left to dry again, and then some gold paint rubbed lightly on bits of it.  Then stuck down lightly to a piece of patchwork fabric and peyote stitched around with seed beads to form a huge bezel, if you think of the pear as a large cabachon.  Then shadow stitched with black embroidery thread (perl or stranded, I can't remember).  I also can't remember if I used felt or thin cotton wadding for the wadding.