Total Pageviews

Showing posts with label sewing. Show all posts

Saturday, December 10, 2016

52 Weeks, 50 Items

I started my last blog post with this paragraph:

I've spent the year studying my brains out, and Facebooking rather than blogging. But I have realised, now that hectic year is over, that I have been doing things I have been proud of all year, that could be recorded more systematically. Hence the fresh start - 52 Weeks, 50 Things. I'm going to post things that I accomplish that I am proud of. It may include items made, mended, repurposed, altered to fit, or even written. This is actually the start of Week Three of my plan, but that's the next post.

It's now Week 5. I probably won't actually finish anything this week, as although I have knitted most of one sock, I'm in Adelaide for a few days now to attend a friend's wedding, and it's unlikely that I will complete the pair!

But:

Week 1, Item 1

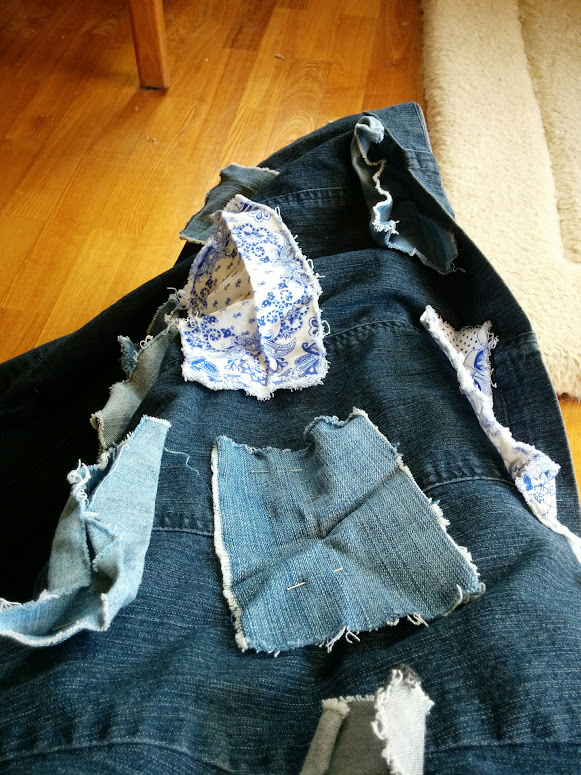
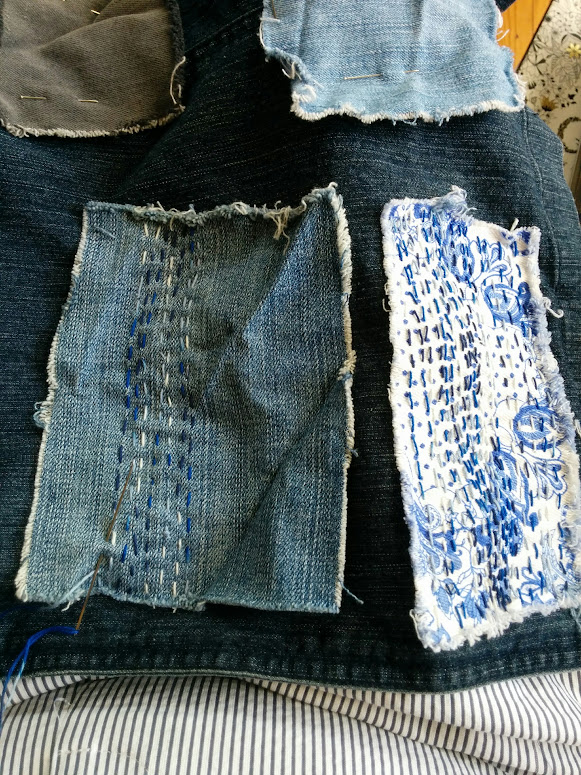
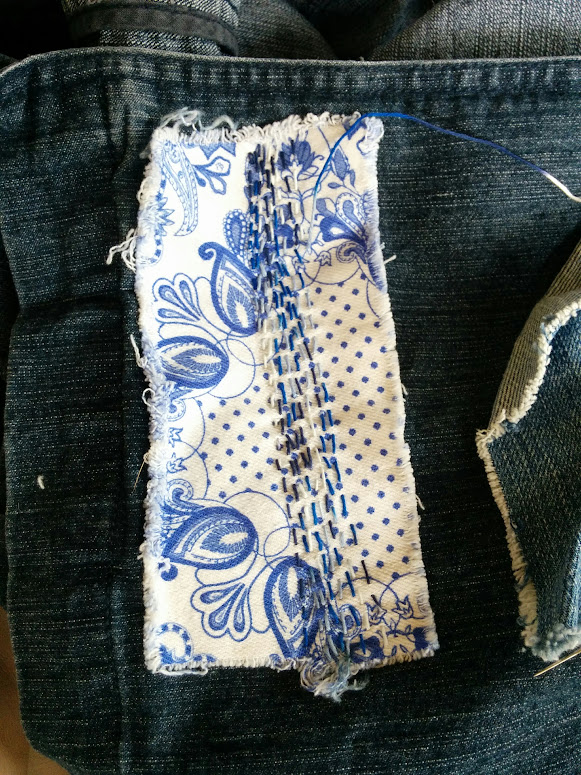
I so rarely get my act together to actually mend something that for the purposes of this next year, mending is going to count. These were brand new jeans, torn when George rescued my disintegrating suitcase a couple of months ago as it fell apart on the way home from - actually, Adelaide. That was a mid-semester break. Now I'm here for a wedding. I love Adelaide but I must admit that I don't normally visit quite so frequently! So I had a good go at 'darning' these jeans. I must say I am moderately proud of the result. I never darn, for a start. And it is actually damn near invisible - I lightening the photo so that you can see the stitching, but in real life both cloth and thread are a very deep, dark black.

Item 2, Week 2

A nightshirt for George. Embarrassingly, despite having measured him carefully, I then went and carelessly cut out the largest size, which is at least one size too big. I had also carefully measured the extra needed to add to the pattern to turn it from a Tshirt to a nightshirt - and then carelessly made it much too long. It is however comfortable. It also was the first time I'd made a whole thing on my sewing machine in about nine months. It also reminded me that I hate, hate sewing jersey. Yes, I used a ballpoint needle. And an appropriate stitch. And I still hated doing it. And yes, the photo is blurry. Everything hates me, too :)

Week 3, Item 3


Socks for George. Patonyle, the usual generic toeup pattern that I generally use. He loves them. They were pleasant to knit.

Week 4, Item 4


Tubular socks knitted in Woolmeise sock wool. Boring, boring boring. For someone who is very sensitive about how things feel on his feet, therefore made tubular to avoid arguments about size - because no size is ever 'right' for him.

I suspect by the end of Week 6 I may have finished the socks I am currently working on. But then production of things needs to speed up as I have some small Christmas things to knit.

And I intend to make myself some summer dresses. All of the above have been for other people, which is fun, but I have so much fabric and a renewed desire to sew.

For the next few days, however, I intend to enjoy Adelaide and the wedding of my friend. And eat and drink till I burst.

Monday, January 04, 2016

Boro

No, I'm not even going to bother with excuses this time. I just haven't felt like blog writing for several months.

I've just started an upcycling project. Years ago I bought a denim trench coat with the intention of embellishing it in some way. I've had various ideas but none that ever really jelled. I've been reading about the Japanese art of boro and have been hankering to give it a go, so finally decided to try it on the trench coat. I have cut up scraps of denim left over from other projects, or from worn out clothes, into rough rectangles and I am sewing them around the bottom edge of the coat with running stitch. I don't really know what it will look like, but it's worth a go! The only problem so far is that I am sewing on the front of the coat where I have to go through two layers of denim plus the patch, because of the facing, and it's hurting my wrist a bit. Most of the patches will only go through one coat layer, however, so should be easier. Herewith some progress pictures:


It will a slow project, obviously, which suits me fine - it can easily be done in front of the television.

Dressmaking remained largely in my imagination during 2015, sadly. I did finally finish this dress - I drafted this pattern myself and the cotton turns out to be a little too robust for the style. It makes a very comfortable and cool dress to wear at home on hot days. I would only wear it out of the house with something under it (leggings? jeans?) and I guess that with a few more washes, the quilting cotton will soften and drape a bit better and get that lovely patina that quilting cotton gets after it's been washed quite a few times. I am halfwayish through a reversible dress - one side green, one side purple - so hopefully at least some progress pictures will happen soon.


Thursday, February 26, 2015

Hand Made

I haven't blogged for a month but have been productive, just not in the photographing and writing sense. The only finished piece of dressmaking is the totally handsewn Alabama Chanin inspired dress that I am blogging about today. There are another two dresses partially sewn waiting by the sewing machine, too, plus another cut out but not started, and fabric washed and prepared and patterns prepared to cut out another three things. (And uni starts on Monday, so I'm not really sure how quickly any of that will progress!) There are also two small shawls finished but not blocked or photographed.

I love the Alabama Chanin look (there's a link to her site on my list of links on the side of the blog, if you don't know what I am talking about) but for my first go I did not want to go to all the trouble of the stencilling and reverse appliqueing and stuff that looks so fantastic but I suspected I would get bored and grumpy with it. I intended to do a very simple tunic/short dress and make a feature of the seams with contrasting thread and possibly a little bit of stitched embellishment, just using one layer of jersey. In the end I gave up on the embellishment because I found it impossible to keep my tension on one layer of jersey - doing the seams and binding was easier because it was always at least two layers, so if I do another piece (and I would like to) I might consider double layers and a touch at least of reverse applique or something similar.

I used 1 metre of 100% cotton jersey from Clegs (navy blue), and the heaviest Guterman thread (uphosltery, perhaps? I can't remember) used double (bright red). I drafted the pattern from a jersey nightie I love could easily be worn as a dress, and it fits comfortably.


Navy blue is incredibly difficult to photograph. It didn't seem to matter whether I used natural light, filtered light or flash, it never came out the right colour. It is an ordinary, bog standard navy blue. It looks abominable just hanging on a hanger but I promise it looks better on, I'm just terrible at selfies.


This is a detail of the stretchy stitch I used to attach the bindings round the neck and armholes. There are a variety of options but I liked the simplicity of this one. The seams and flat felling are done in running stitch.


This is just another stitching detail, the same as before, but it gets a bit closer to the real colour.

I haven't worn it yet but will soon. Yes, I know summer is technically almost over in Australia, but there is always substantial warm (and often hot) weather during March and sometimes into April, and it's also designed to be a layering piece worn with a long or short sleeved Tshirt underneath and over jeans or leggings, so I intend to be able to wear it all year round.

It was fun to do. Yes, it was time-consuming, as you would expect with a totally handsewn item, but I could do it all in front of the TV and it was oddly relaxing to do. I'll have to wash it in a lingerie bag on the delicate cycle but that isn't a huge imposition. I really enjoyed the handsewn ethic, down to the fact that I drafted my own pattern from something I already owned.

Thursday, December 18, 2014

Hemming Jeans

No 'real' sewing to show, but I have proved that the sewing machine still works :)

Since my MiL died eighteen months ago, there was no-one to shorten George's jeans unless we paid $30 to the nice people in the little alterations place at The Glen. (Who do a great job but that's a bit pricey for jeans. We use them for formal trousers and the like). It's one sewing job I had never felt srong enough to tackle. I have spent six months being stared at balefully by two pairs of jeans/chinos and a husband, who proved the point at the weekend by busting the zip on a pair of summer pants and then tearing a pair of shorts so dramatically that all we could do was laugh hysterically.

I gave this tutorial a go:

http://www.sewmuchado.com/2011/06/tutorial-how-to-hem-jeans-and-keep-the-original-hem.html

and this is the result

I also did a black pair but that photographed badly. I am quite pleased with the result, let's see what George thinks when he gets home.

I also finished the shawl I;ve been working on for some months but haven't blocked it yet, so that can wait until I can post a picture.

Friday, December 12, 2014

On the Trail of My Sewing Mojo

I haven't done any dressmaking for a very long time. I have been in a total funk about fit and whatnot. But I have recently bought LOTS of pretty fabric and read books about fit (reread books about fit, actually) and I;m almost ready to do some real sewing.


This is one pattern I want to try. It is dead easy, so long as I can get some sort of correct fit. It's a bit short for me but that's an easy alteration. Tissue fitting has suggested some slashing and spreading is required. I am using a fabric that I like but won't cry over if I can't turn it into something wearable. I refuse to stand in this silly pose while wearing it though!


I've had this book for a while but had assumed that the clothes would not fit or suit me. After doing some heavy duty measuring and thinking I have decided to have a go at a tunic/dress. Slashing and spreading may be required again, plus lengthening the bodice. Again I;m using a nice fabric but not my favorite.

So I suppose this means I am about to launch into hopefully wearable muslins. Mind you, having washed the necessary fabrics, I really meant to iron them today and I have not, so I still have to do that.

Will post updates - even if they are tears and tantrums!

Wednesday, December 11, 2013

Beaded Knitting Necklace, Dog Bed and Refashioning

I have actually accomplished a couple of things in the last week or so.

I am trying various things from the book Betsy Beads by Betsy Hershberg, as mentioned in a previous post about knitting necklaces.  This is the only thing I have completed so far, as now I am knitting a pile of beads to string together, and they are time-consuming.  This is knitted with 4 ply pink cotton and size 6 seed beads, in a purl I-cord (as opposed to the more 'normal' knit I-cord).  According to the book, doing I-cord in purl forces it to spiral.  My tension obviously isn't tight enough, even though I am using tiny needles (something like 1.5mm, can't remember exactly) with the cotton.  It did spiral a bit, but I still have to twist it a few times to produce the desired spirally look when I wear the necklace.  I didn't do a great job of attaching the magnetic clasp, sadly, though that doesn't show so much when you are wearing it, but it looks nice on and I am quite pleased with it.  Pictures of the knitted beads to come, eventually.


I've been meaning to make Sirius a new dog bed for ages, having bought this cheerful polar fleece some months ago.  She eats her beds, and I don't resent it when it's polar fleece, which is cheap, so I make her one every couple of years.  This is bigger than the previous ones, and it's a bit like a nest.


I think she likes it!  She likes to have a bed under my sewing table in the family room, even though she can't use it when I am actually sewing.


I also did a ridiculously easy refashioning project.  I was culling my wardrobe recently and picked a few summer dresses to donate to op shops.  This one was in that pile, but I realised that I really liked the fabric, and I was only ditching the dress because the top fitted badly (it either rode up, making me look heavily pregnant, or pulled down, which exposed half my bra).   So...


 Quick chop of skirt from bodice, and removal of a couple of inches of it to tidy it up and make it above ankle length rather than scraping the ground.  Pictured with trusty scissors and the roll of black elastic that will provide a waistband.


A quick pin, a careful zig-zag, and a skirt, voila!!


Saturday, October 19, 2013

Vogue Pattern V2971

So I decided to make Vogue V2971 for the party at the end of the Geelong Fibre Forum, for which the theme was Polka Dots and Paisley.  As it happened, I didn't get it done in time, and I also discovered an old white skirt with bright pink and lime green polka dots that was perfectly suitable.  But I had spent $70 on the fabrics, which I liked, so I wanted to finish it later on and wear it somewhere nice.  I finished it yesterday and I'm wearing it tonight to a 21st birthday party.

It's a design by Dutch designer Koos van den Akker, and it was rated Advanced.  I figured that being an experienced sewer, albeit with rusty skills, I should be ok.  I even remembered to check the pattern measurements against my own; I was slightly miffed to discover that my waist measurement meant a MUCH larger size than I take in RTW but I obediently cut it out that size. The first part, embellishing the front panel, took quite a long time and was a bit fiddly but not hard at all, for someone who has done lots of textile art, and so I had the hubris to believe that the rest of it would be a doddle.  After all, all I had to do was sew some seams, insert a zip, put on a waistband and sew the hem.


VV2971

To meet the Polka Dot and Paisley scheme I chose the most appropriate materials in the (limited) range at my local Lincraft (I didn't have time to go further afield if, as I had planned at the time, I was going to get it done in time for Geelong).  So I chose these fabrics, shown here in the approximate proportions that appear in the finished skirt.


Ok, so it was really ADVANCED it turned out.  The zip was fine to insert - except that when I did the waistband later, which had elastic in it, I realised that the humongous size it had insisted upon according to measurements was large enough to allow me to pull it on just using the elasticated waistband and that the zip was a waste of time and money, but by that stage it would have taken too long to remove the zip and make it look as though it had never existed.  Never mind, that bit is OK, it just loos like (and is) a done-up zip below a waistband.

The seams - ye gods and little fishes.  Talk about origami.  NOT intuitive.  Despite dutifully marking every notch and circle and other things, and pinning everything together numerous times until it looked EXACTLY like the drawings, I realised that the ******* pockets were neatly aligned on either side of the - back zip.  I must have got the markings mixed up somewhere!  Anyway, I was ready to eat the thing that at stage so I just sewed it that way and sewed over the pocket openings, though I would really have liked pockets in it.

I also didn't measure the finished length - I knew it was going to be long and I like long skirts and I am of average height and THEREFORE I assumed that if I turned the hem up to the measurements on the pattern that it would be the length that it is on the model.  She must be taller than me - it's about two inches longer than I really wanted, which makes it long enough to tread on if I'm not careful, by that stage I just could not bare to change the length - it wasn't a straightforward hem, either, it was a bonkers shape so it would have been time-consuming and difficult to shorten it at that point.  And I don't wear heels.  Actually, having another look at the photo, I DID get the length right, it's just that she is wearing stonking great wedges and I will be wearing ballet flats.  Don't care, it's still a cheerful outfit.


Wednesday, September 26, 2012

Shh... Sewing!

I haven't done any dressmaking for a LONG time.  I have been trying to screw up the courage to start again for ages.  I thought buying my new Janome machine last year would do it.  Well, I did use it a bit, for textile art bits and pieces, but I could never get comfortable at the table it was on.  So George bought me a dewing table that's the right height and my back no longer hurts when I sew.

That was only a month ago so I haven't waited TOO long, considering how long I've been out of the game.  But really, the only thing that has pushed me into it at long last is the fact that I need a nice dress for Saturday (yes, that's the Saturday in three days time) and I can't wear any of the nice ones I already have because they are for warmer weather and it is going to be FREEZING.  (Late September in Melbourne can be anything, weatherwise, so I could well have got away with a sleeveless dress!)

I steeled myself to cut out the pattern.  To alter the bodice slightly.  Yesterday, to cut everything out.  Today, sewing commences.  Am I scared?  YOU BET!!!  But here goes!!


Friday, September 23, 2011

My Creative Space

I am trying to turn my 'Mazey Patchwork' into my signature style, and this week has been about working on this piece and taking close ups of it.  Basically it is a stitched form of complex cloth, which once it comes off the machine is cut up into random shapes and then further embellished with hand stitching, beads, buttons, etc, lined with satin or something similar and turned into brooches and other fabric jewellery forms.


Enjoy!  And enjoy other creative spaces here!

Thursday, September 08, 2011

My Creative Space

I am enjoying a day off today! OK, so I took Wombat to the doctor this morning, but he was enjoyable company and we had morning tea so it was fun. Then we came home and I have been managing to relax creatively ever since!

The latest non-haiku. I;m not sure why the photo is so bad, other than my dubious photography skills. Oh, and the fact that the camera is dying and is going to be replace sometime soon. (Not that that will improve my photography skills, but maybe the pictures will bebetter by default anyway!)


The latest completed hat.


The latest hat-in-progress. I am actually get sick of hats but I want to finish off the yarn I bought to knit hats, which means one more after this one, and then embellish them and get them up for sale at Mazey Pretty Things.


And I have spent some time on my luvverly new sewing machine. I am making a Mazey patchwork cloth to cut up and embellish and turn into brooches, etc. I think of it as my version of a 'complex cloth' and each layer adds extra to it.

This week at work hasn't been too bad - I have been able to concentrate on my actual job, which I quite like, rather than running around doing other people's work as well as my own. And then having today off helps! Performance review tomorrow - a little nervous.

For more creative spaces, see here!
Posted by Picasa

Thursday, August 04, 2011

My Creative Space

Well my work week has been distinctly uncreative, being fraught with tedious but stressful issues that i just want to forget about.  So I am surrounding myself with wonderful, creative purchases - and yes, most of them have been bought this week, except for two of the books that I bought a month ago and then forgot about!


After six months of working for a living I had saved up enough to buy myself a new sewing machine in a sale.  The last day of the sale!  It is a Janome Memory Craft 6500 and it does whizzy things.  I believe.  It will probably be Saturday before I have the concentration and energy to actually try it out.  But the instruction manual is interesting! 


Graham certainly thinks so, anyway.  Now he will be able to tell me when I am doing something wrong!  And to give him his due, he actually does know quite a lot about the subject in general and I expect he will soon be up to speed on this particular beast.  Maybe I will follow Baby Bear's lead and give it a name (she names all her musical instruments).

And then I bought some books, mostly at the Craft Fair at Jeff's Shed the other weekend, all which I am hoping will provide creative inspiration of one sort or another.  And I actually bought another three today but they can wait for another photo session!


For more creative spaces, pop over here.  Maybe some of them have actually made something rather than just buying inspiration!